Latest Article

Casbay News

Promotions

Casbay Events

Tips Sharing

aaa

Stay tuned with us

enable vMotion Traffic on VMkernel

Tutorial: Migrating Virtual Machine(VM) by vMotion

How To Migrate VM by vMotion

VMotion allows live migration, allowing a user to move from one physical server or pass the operating virtual machine to another physical server. In this case, your ESXi host is your physical server, where you create virtual host machines. You can move your virtual machine from one host to another host easily by using vMotion.

Therefore, we would like to guide you how to configure vMotion Traffic on VMkernel and How to do the Live Migration.

Firstly, let’s see how to enable vMotion Traffic on VMkernel:

Step 1:

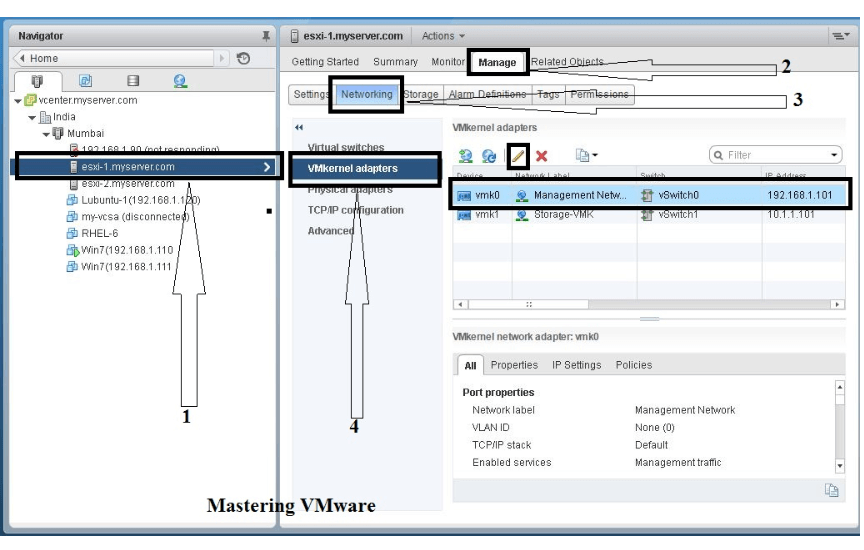
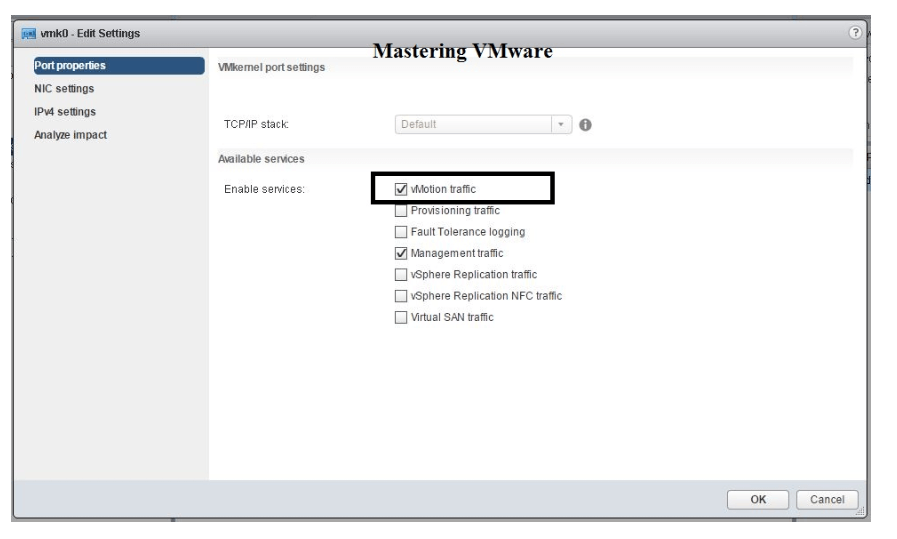
First login to vSphere web client and then choose the Host on which VMKernel you want to enable vMotion Traffic. After this, click on “Manage Tab” then click on Networking. Click on VMKernel adapters, you can see available VMKernel adapter on your host. After that, click on “Pencil Icon” to edit the VMKernel settings. The instruction picture as below:

enable vMotion Traffic on VMkernel
Choose the Host on which VMKernel

Step 2:

Choose the Port Properties first option. Here you can see the available service which you can enable on your VMKernel port. However, we just require vMotion for Live migration so check the box “vMotion Traffic”, click OK to save & close.

Tick ‘vMotion Traffic’

So now, let’s see how to migrate the virtual machine using vMotion.

Step 1:

Now you are already in the vCenter Inventory. Choose the VM you want to migrate. Right click & click on “Migrate”. In my case as you can see I am migrating the VM named as “WIN 7(192.168.1.110)” which is on host “esxi-1.myserver.com”.

migrate the virtual machine using vMotion
Choose the VM you want to migrate

Step 2:

Now as you can see the Migration wizard. First you have to choose what you want to migrate. We are just migrating our VM from one host to another so just check “Change compute resource only”. Click Next button to continue.

Change compute resource only

Step 3:

Here you have to provide the Host on which you want to migrate your VM. You can also choose the Clusters, Resource pools & vApps as we called virtual applications. Therefore, choose the correct host and click Next button to continue.

virtual applications
Choose the correct host

Step 4:

You can specify Network for your VM on the destination host. You can see the Source Network and also choose which Destination Network you want to use at the same time. So choose your correct network and click Next button to continue.

destination host
Specify Network for your VM on the destination host

Step 5:

You can also provide priority to your vMotion. You can either choose first one default which will migrate VM now. Either than that, you can Schedule Migration by second option “Schedule regular vMotion”. Therefore, choose according to your requirement and click Next button.

priority to your vMotion

Step 6:

Now we are ready to migrate our VM. So before that migrating review all the details. Click Finish to start migration.

migration
Ready to migrate our VM

Step 7:

You can see the migration status in the Recent Tasks. After successful migration you can check the VM connectivity.

migration-Recent Tasks.
Migration status in the Recent Tasks